> For the complete documentation index, see [llms.txt](https://docs.revelator.com/pro/llms.txt). Markdown versions of documentation pages are available by appending `.md` to page URLs; this page is available as [Markdown](https://docs.revelator.com/pro/platform/finance/tracking-your-revenue.md).
# Sales Reporting
Revelator records all income from your connected services and itemizes it in your earnings reports. View reports as a summary of your income, or track income trends by artist, tracks, channels and more. Reports that require foreign exchange (FX) are noted, so you can be sure to record income in the right currency, and distribute it after to payees correctly.
## **Revenue Metrics**
* Total Revenue: Earnings from streams and downloads.
* Total Units: Number of downloads or sales.
* Top Tracks and Releases: Highest-earning tracks and releases.
## **Revenue Metrics**
* Total Revenue: Earnings from streams and downloads.
* Total Units: Number of downloads or sales.
* Top Tracks and Releases: Highest-earning tracks and releases.
## Revenue
Reports are automatically generated by Revelator based on data from connected services and the information you have previously input. To import other earnings reports, click the “+ Import report(s)” button and upload one file at a time. Files should be uploaded in the format provided by any supported service. Reports are separated into four categories:
* Digital
* Physical:
* Licensing: Coming Soon!
* Publishing: Coming Soon!
At the top of the page, select the time period you would like to view earnings reports for. The last 3 months will be displayed by default. Additionally, you may select from:
* Last month
* This quarter
* Last quarter
* This year
* Last year
* Choose dates
Enter text in the search bar to find reports by name. Additionally, you can also group reports by selecting one of the options from the drop down menu to the left of the search box:
* Source
* Date
* iTunes payment
Use the Revelator platform to manage and view your digital asset earning reports from the Digital Service Providers (DSPs) that distribute your content.
## How to view sale reports from DSPs (auto-ingested or manually uploaded)
1. Navigate to **Earnings** in the left main menu.
2. In the Earnings page, you can view auto-ingested or manually uploaded sale reports from DSPs.
3. Select the period you would like to view.
|  | Depending on how you want the reports to be organized, the period selected will either be: (i) the desired **Activity period** of sales from all DSPs or (ii) the desired period of **iTunes payment** months across all iTunes/Apple portals as reflected in your iTunes Connect account. (See more in the [**Group by**](broken://pages/-MEr7UenEnmeiIRnOaQX#8ac1bbfq32qs) field description below). |
| ----------------------------------------------------------------------------------------------------------------------------------------------------------------------------------------------------- | ------------------------------------------------------------------------------------------------------------------------------------------------------------------------------------------------------------------------------------------------------------------------------------------------------------------------------------------------------------------------------------------------------ |
1. Choose a date option from the dropdown list at the top: **Last month**, **This quarter**, **Last quarter**, **This year**, **Last year**, or **Choose dates** and select the **Start** and **End** dates from the popup calendar and click **Apply**.
2. View consolidated details about your sale reports, including:
| **Column header** | **Description** |
| ------------------- | ------------------------------------------------------------ |
| **Source** | The DSP income source. |
| **Activity period** | The earnings activity period. |
| **Amount** | The amount of earnings. |
| **Status** | The status of the report, marked by color-coded indications. |
5\. Sort reports by clicking a column header. This displays the reports list in ascending or descending order according to a particular header.
6\. Choose an option from the **Group by** field at the top to organize the reports. The reports can be grouped by DSP **(Source)**, by month **(Date)**, or by a special iTunes filter that groups together reports only from the iTunes/Apple portals according to the payment month **(iTunes payment)**. You can click on a DSP when grouped by source to view the DSP report for the specified source, you can click on a month when grouped by date to view the report for the specified month, and you can click on a month when grouped by iTunes payment to view the report of the iTunes payment for the specified month.
|  | Using the **iTunes payment** filter allows you to reconcile the total amount shown from all iTunes/Apple sale reports with the payment amount found in your iTunes Connect account. |
| ----------------------------------------------------------------------------------------------------------------------------------------------------------------------------------------------------- | ----------------------------------------------------------------------------------------------------------------------------------------------------------------------------------- |
7\. Select an Earnings report, and choose a report action from the **Options** menu (on the top left):
| **Option** | **Description** |
| ------------------------------------- | ------------------------------------------------------------------------------------------------------------------------------------------------------------------------------------------------------------------------------------------------------------------------------------------------------------------------------------------------------------------------------------------------------------------------------------------------------------------------------------------------------------------------------------------------------------------------------------------------------------------------------------------------------------------------------------------------------------------ |
| **Reprocess errors** | Reprocess a report to remove content errors from it. For example, if a sales report had a content error that you then attempted to fix by adding the asset to your catalog, you can reprocess the report to automatically remove the error. |
| **Detach errors** | Detach errors from a report. Use this option to split a report into two separate reports, one report without transaction errors that is ready for approval, and another with transaction errors.
For example, if your original report contains 10 lines in which 2 are errors, the Detach errors option will break this into a clean report with 8 lines, and a second report with 2 error lines. As you fix errors, you are able to continue doing the Detach errors process until no more error lines remain.
|
| **Approve all unapproved statements** |  Approving reports cannot be undone!
Before you proceed to approve all unapproved statements at once, first verify that the total for each report that you want to approve is correct, that you have applied all appropriate FX rates, and that you have applied any appropriate adjustments (Merlin fees, etc.).
After you have completed all of the above verifications steps, click the Approve report button displayed in the Approve report window.
|
| **Unapprove** | Unapprove the selected statements. |
| **Download** | Download the report as an Excel file. |
8\. Review the sales report using the **Actions** menu adjacent to the sales report name:
| **Option** | **Description** |
| ------------------- | ------------------------------------------------------------------------------------------------------------------------------------------------------------------------------------------------------------------------------------------------------------------------------------------------------------------------------------------------------------------------------------------ |
| **Visualize** | Open a web view of the sales report |
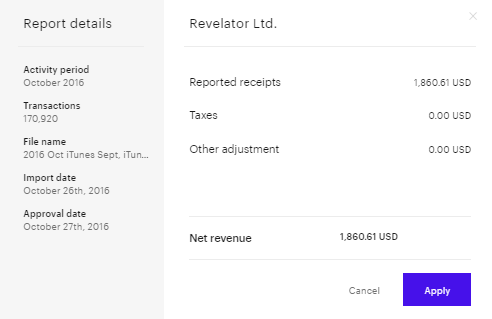
| **Info FX & taxes** | View FX and tax details about the report. Click Apply to upload FX and tax information provided by the DSP.
|
| **Download** | Download the sales report as an Excel file. |
| **Get link** | Get the link to view the sales report. |
8\. Filter the sales reports. Click **Filters** at the top and specify one or more filter options, **Report type** (for example, Revenue Report or Sales Statement), **Territory**, and **Service** (for example, The Orchard).
9\. Search for words in the earning report titles by typing in the **Search** field at the top.
## How to import sales reports (auto-ingested or manually imported)?
1. Click **Import reports** to manually upload sales reports.
You can select the checkbox to import releases and tracks metadata from reports if they don't already exist in your catalog.
|  | Only use with prior approval from Revelator client support. This is an extreme measure since DSP reports can contain inaccurate metadata. |
| ----------------------------------------------------------------------------------------------------------------------------------------------------------------------------------------------------- | ----------------------------------------------------------------------------------------------------------------------------------------- |
2\. Upload or drag the sales report file from your computer to ?? .
---
# Agent Instructions
This documentation is published with GitBook. GitBook is the documentation platform designed so that both humans and AI agents can read, navigate, and reason over technical content effectively. Learn more at gitbook.com.
## Querying This Documentation
If you need additional information that is not directly available in this page, you can query the documentation by asking a question.
Perform an HTTP GET request on the following URL with the `ask` and `goal` query parameters:
```
GET https://docs.revelator.com/pro/platform/finance/tracking-your-revenue.md?ask=&goal=
```
`ask` is the immediate question: it should be specific, self-contained, and written in natural language.
`goal` is what the user is ultimately trying to achieve, the reason they need the answer. Sharing it helps GitBook give you a better, more relevant answer. A goal is most helpful when it describes the outcome the user wants rather than restating the question. For example, with `ask=how do I create an API token`, a goal like `automate deployments from our CI pipeline` lets GitBook tailor the answer to that use case.
The response will contain a direct answer to the question and relevant excerpts and sources from the documentation.
Use this mechanism when the answer is not explicitly present in the current page, you need clarification or additional context, or you want to retrieve related documentation sections.